Ever wonder how to make sense of your Humminbird fish finder’s display? It’s not a map but a scrollable sonar history that reveals what’s beneath your boat.
Knowing what to look for, like the bottom’s bright lines or raw arches, helps you fish smarter. Once you get comfortable with the basics, fine-tuning your settings can make a big difference.
The full guide below walks you through everything.
Learn How Your Screen Scrolls and Where the Zero Line Is
Your screen displays sonar history from right to left. New echoes appear on the far right, while older data slides off the left edge. This display is not a live snapshot but a continuous record of what your transducer has recently passed over. You’ll notice fish and structure first show up on the right and then drift left as time goes by. Faster scrolling causes data to move off quickly, making it harder to analyze targets, while slower scrolling allows you to study the details more carefully. The Zero line marks the shoreline at 0 depth on compatible maps. Humminbird’s AutoChart uses this Zero line as the baseline for creating custom maps when no contour data is available. Without a Zero Line Map Card, you cannot build or view shoreline-based maps. Remember that the position of objects on the screen indicates the timing of echoes, not their actual direction or location. You are reading a historic record, not a real-time feed. It’s important to differentiate sonar history from map baseline references for accurate interpretation. For targeting crappie, you might consider top fish finders that specialize in clear target separation. The transducer emits sonar pulses that bounce off underwater objects and return as echoes for the display. For the best performance in harsh conditions, a model with superior saltwater durability ensures reliable operation and long-term value.
Check Depth, Temperature, and Speed First
Start by verifying the depth reading immediately upon startup. Depth is your primary safety indicator for avoiding shallow water hazards. Next, check the temperature, which provides insights into surface water conditions and helps locate active fish. If you have the Temp/Speed accessory or a GPS, confirm the water speed to ensure your trolling pace or travel rate is accurate. For reliable communication while out on the water, consider pairing your fish finder with one of the best marine CB radios with antennas for strong signal quality. You can customize how these data points display through menu settings. Arrange your data windows to show the most critical information prominently. Remember to verify calibration settings for both temperature and speed; inaccurate sensors can lead to false readings. Depth alarms can also be set here for shallow-water warnings, adding an extra layer of safety. For the best performance, compare top depth finders for your boat to ensure you choose a model that matches your specific navigation and fishing needs. You may also want to review top GPS fish finder models from Humminbird that combine navigation accuracy with reliable sonar performance.

Delivers uninterrupted depth readings from 2. 5 to 600 feet on the largest display available on an In-Dash Depth Sounder up to 60 mph

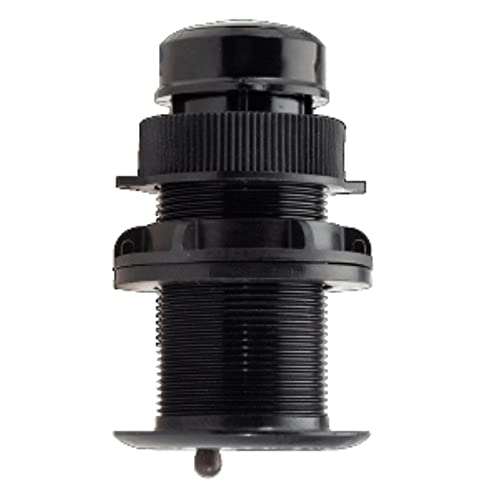
This plastic thru-hull NMEA 2000 smart transducer combines precise depth, speed and temperature signals with attitude sensing for heel/trim and pitch/roll data.
Read the Bottom Line to Find Drops, Humps, and Hard Spots
To spot drops, humps, and hard spots, focus on the bottom edge of the sonar display. The lowest solid line shows the bottom contour. Look for steep changes—sharp rises or falls—in that line. A sudden drop indicates a drop-off ledge, while a rise followed by a fall suggests a hump. Pay particular attention to structure edges, where the contour shifts; these are prime ambush spots for fish. A flat, straight bottom line usually means less activity. Hard spots appear as thicker, brighter lines, indicating hard material like rocks or gravel. Soft bottoms look thin and dim, often signaling mud or sand. Jagged contours typically mean rocky or gravelly terrain rather than soft sediment. Always read beyond flat areas and observe gradual changes—these shifts and textures mark the most productive fishing spots. Understanding fuel sending unit readings on a separate gauge can similarly help you locate changes in boat weight distribution that affect sonar performance. When using a manual depth setting set at 2-3 times the current depth, you can more clearly detect secondary echoes that reveal bottom composition. For the best on-the-water results, choose a unit with features suited to your specific boating needs and budget. Ensure your trolling motor transducer is properly oriented to avoid signal interference and maintain accurate bottom readings.
When to Trust Fish Icons vs. Raw Arches: What Fish ID+ Misses
Trust the raw arch over fish icons whenever precision is needed. Fish ID+ uses detection thresholds that often miss weaker returns, meaning baitfish or small targets might not be represented by icons. It also can generate false positives, turning bubbles, weeds, or turbulence into fish symbols. The raw arch shows the actual echo pattern, revealing target strength, isolation, and proximity to the bottom. While fish icons provide a quick filter, they do not compensate for key settings like sensitivity and chart speed, which are essential for dialing in clear arches. They do not confirm species or size. For accurate identification, especially near cover or suspended fish, always verify with the raw arch. Understanding how blobs and bait balls appear on screen helps distinguish schools of forage from individual game fish. For anglers relying on a fixed position, top radar mounts can provide the stable platform needed to get a clear, consistent view of these raw arches.

Scotty Universal Fishfinder Mount uses a new multi pattern universal top plate

The iBOLT Fish Finder IncrediBOLT Clamp is the perfect way to keep your Fish finding device secure while enjoying your favorite watersports. Whether you're kayaking, fishing, or just enjoying the outdoors, this mount will keep your device safe and secure in even the most rugged conditions. The Universal Marine Electronic Fish Finder Mount allows you to easily mount your GARMIN GPSmap 7x12 or LOWRANCE HDS 12, making it the perfect addition to any fishing adventure.

Two installation options: Mounts directly to a boat guide rail or to a compatible M6 fixing hole, giving you a flexible setup for fish finder electronics.
How Humminbird’s DualBeam PLUS Changes What You See
Humminbird’s DualBeam PLUS enhances your sonar view by firing two beams simultaneously, rather than relying solely on raw target arches for accuracy. It uses a narrow 20° beam for detailed images of the bottom and a wider 60° beam to scan broader areas for fish. When both beams cover the same water column, beam overlap occurs, and display blending combines their returns into a single, more informative view. This blended display emphasizes sharp structure with the narrow beam while providing broader coverage with the wide beam, resulting in a fuller sonar picture. You’ll be able to see weeds, cover, and bottom contours more clearly. For targeted viewing, you can compare each beam side by side—using full-screen narrow for pinpoint details or full-screen wide to scan larger zones efficiently. For further customization, consider labeling your switch panel controls with top boat labels to quickly toggle between beam modes. To keep your sonar signals clear, ensure that your navigation light wiring is properly routed away from transducer cables to avoid electrical interference. Understanding how night vision cameras work can help you choose similar low-light technology for enhanced safety after dark.

Transom-Mount Transducer: Provides Down Imaging and DualBeam PLUS sonar for a wide range of Humminbird models

Includes dual-beam transducer with Garmin Chirp traditional sonar for crystal-clear images and remarkable target separation.Control Method:Touch.Special Feature:Bluetooth.

Transom-Mount Transducer: Provides Single/DualBeam sonar with 455/200 kHz frequencies
Match Boat Movement to Screen Patterns for a Clearer Picture
Matching your boat movement to your screen patterns is essential for a clearer picture. Your boat’s speed directly influences how targets appear on your Humminbird display. Moving faster causes fish marks to form into sharp, steep arches, making them easier to identify quickly. When you move more slowly, these marks stretch into longer, low returns, providing a different perspective on fish location and bottom structure. If your boat is stationary, moving fish will draw flat traces across the screen, so you’re reading their movement rather than just the bottom features. For reliable readings, consider the top speedometer picks to accurately match your boat speed to your sonar display. A quality fish finder mount for your canoe can also stabilize your transducer for consistent readings. For a clean installation, follow the step-by-step instructions provided in the kayak fish finder guide.
To keep your readings accurate, ensure your sonar speed matches your scroll rate. When these are out of sync, you risk distorted arches that misrepresent what’s below. Auto scroll settings help manage this for you, maintaining the right balance. Look at the screen edge where fresh bottom lines appear. They should be continuous; any breaks indicate you’re not seeing current conditions, which can lead to false readings.
Adjust your speed depending on your fishing approach. Faster scrolling preserves detail at trolling speeds, making it easier to spot fish passing beneath you. On the other hand, slower scroll rates work better when drifting, providing a more detailed view of structure and targets. When you see a full, symmetrical arch, it means you passed directly over a fish. A half arch shows you hit the fish off-center. Keep in mind, structure tends to hold a consistent shape, but fish will shift shape with your boat’s movement. For side imaging, aim for speeds between 2 and 8 mph for optimal detail and clarity.