
Ever wonder how to wire a boat horn safely and reliably? Getting it right ensures your horn works when you need it and stays protected from the elements.
With the right wiring setup—using marine-grade materials and proper mounting—you can keep your boat sounding its warning without risking damage to your electrical system.
Keep reading for a complete step-by-step guide.
Step-by-Step: How to Wire a Basic Two-Wire Boat Horn
First, disconnect the boat’s battery or isolate the circuit to prevent shorts and shocks before touching any wires. Use a meter to confirm the circuit is dead. For proper horn placement, mount it where it is protected from spray and positioned to shed water effectively. Identify the two leads of the horn; for non-polarized models, you can swap the connections, but always check the terminal labels. Marine horns generally lack strict wiring color codes—just positive and negative—so focus on the terminal function. For under-deck installation, locate a spot toward the front where water flow is minimal. For anglers using small watercraft, similar care in placement is needed to keep electronics dry, much like choosing a top-rated fish finder for a float tube. For reference, the same principle of protecting electrical connections from moisture applies when selecting an anchor light designed for exposure to spray. A basic fuel sending unit uses a variable resistor to indicate fuel level, and you should protect that wiring from moisture just as carefully.
Route the positive wire through a 5A fuse placed close to the battery to protect the circuit. Connect this fuse to the horn’s positive terminal. Attach the horn’s negative lead to a clean, solid ground point on the boat’s metal structure. Use insulated crimp connectors and seal all connections with heat-shrink tubing to prevent corrosion. Leave a slight slack in the wiring to avoid strain on the connections. Once all wiring is secure, reconnect the battery or circuit power and briefly test the horn to ensure proper operation.

Interchangeable/Compatible with all automobiles and devices equipped with 12V DC power source

Has a totally sealed sound unit with type 304 stainless steel cover, diaphragm and mounting bracket

【Super Loud Car Horn】Our boat horn marines are designed with powerful internal reflux and stable frequency, which loud up to 130DB. Providing you a loud and clear sound to warn others.
Tools and Materials for Boat Horn Wiring
To wire your boat horn safely and effectively, you’ll need several key tools and materials. Start with marine-grade stranded copper wire, ideally tinned, to withstand saltwater corrosion. Use red wire for the positive connection and black for the negative. The wire size should match the circuit’s current draw and total round-trip length to prevent voltage drops or overheating. Understanding the basics of marine electronics—such as how marine speakers are designed to endure harsh environments—can similarly guide your horn wiring choices for durability.
An inline fuse holder with a fuse rated at 5 or 8 amps is essential to protect your circuit. Make sure the fuse matches your horn’s amperage requirements. The horn button must be rated for at least 5 amps, typical for marine push-button controls. For secure, corrosion-resistant connections, use crimp-on terminals and female quick-connect tabs.
Heat-shrink tubing is vital for moisture-proofing your connections and preventing corrosion over time. Your power source will be a standard marine battery that allows you to test your wiring setup before final installation. You’ll also need basic tools such as wire cutters, wire strippers, crimping pliers, a Phillips-head screwdriver, and possibly a drill with bits for mounting. Applying silicone sealant at mounting points ensures a waterproof seal and longer lasting installation. For additional protection against moisture, consider mounting your horn near top marine bluetooth speakers to keep all electronics in a drier area of the boat. For choosing the best setup, refer to top fish finder reviews to compare electrical requirements alongside your horn wiring.
When and How to Add a Relay to Your Boat Horn Wiring?
Adding a relay to your boat horn wiring is essential if your horn’s current draw exceeds your switch’s capacity or if you’re upgrading to a high-output air horn. A relay handles the high current separately from your control switch, protecting the wiring and ensuring reliable operation. To install a relay, connect terminals 30 and 87 for the power circuit, with terminal 30 linked to a fused battery positive source and terminal 87 going to your horn’s positive connection. The control circuit is completed by wiring your horn button between battery positive and terminal 85, while terminal 86 is grounded. When you press the button, the relay clicks, indicating it’s functioning correctly. Mount the relay in a dry, cool spot away from water and heat. Make all connections clean and tight to keep your horn working reliably and prevent electrical issues. For a permanent installation, a thru-hull transducer requires a precisely drilled hole through the hull for accurate sonar readings. If you are also considering other instruments, top speedometer picks for your boat can help you find the right fit. For similar high-performance upgrades, reviewing the best transducer mounts ensures your sonar equipment is securely attached and properly aligned.

★ Details Makes Perfect & Shining In The Dark : Ultra-high-end luxury switch suitable for led indicator light. High quality, made of environmentally friendly anti-retardant materials. On/off switch with adhesive tape backing for easy mounting. Adopt flexible strand copper wire,up to 240W load capacity; Cool illuminated light, built-in two premium LEDs emit soft light to illuminate the patterns, easy for you to find the switch in the dark. Pattern & words both shining, words contantly lighting.

【Equipped With Independent Switch Button Harness】Comes with dedicated control switch and wiring harness, easy to install. You can freely turn the horn on/off as needed without modifying the original car circuit.
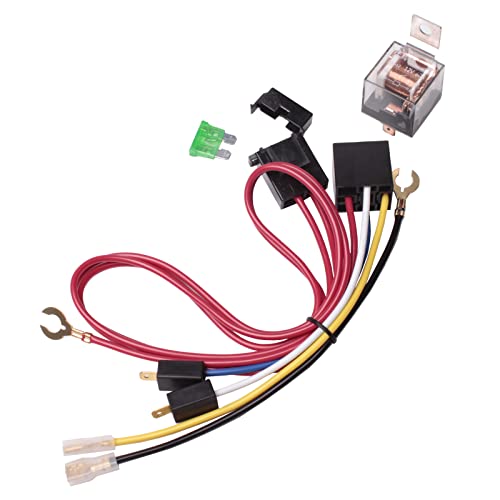
Interchangeable/Compatible with all automobiles and devices equipped with 12Volt DC power source
Select Wire Gauge, Fuse, and Route Cable for Boat Horn Wiring
Measure your total wire length carefully, considering the entire round-trip distance from the battery to the horn and back. For circuits under 25 feet, use 14 AWG wire; for 26 to 40 feet, switch to 12 AWG. Longer runs require an increase in wire gauge to reduce voltage drop and ensure proper operation. Choose tin-coated, stranded marine wire for better flexibility and resistance to corrosion, which is vital in marine environments. Selecting the right boat switch panel can simplify wiring and ensure reliable power distribution. When installing electronics, a reliable waterproof mounting base ensures the compass stays securely in place for consistent navigation. For optimal sonar performance, pairing the horn’s wiring with a high-quality transducer can enhance overall navigation electronics.
Select a fuse that is rated slightly above the horn’s current draw but protects the wire from overheating—in most cases, a fuse rated for 3 to 5 amps works well. Place this fuse within 7 inches of the power source to ensure the entire wire is protected. When routing the cable, plan your path to avoid heat sources like the exhaust and moving parts that could damage the wire over time. Secure cables every 18 inches with cable clamps or ties, and pass wires through split loom tubing or grommets when crossing sharp edges to prevent abrasion. Finally, cut wires to length with just enough slack to avoid stress on terminals, but not so much that it creates clutter or interference.

Marine-Grade Tinned Copper Wire: NAOEVO 12 gauge marine wire features oxygen-free tinned copper for excellent conductivity and corrosion resistance—built to last longer than ordinary copper wire in harsh marine conditions.

HIGH QUALITY: CONEPY marine wire is crafted from high-precision, oxygen-free tinned copper strands, offering excellent conductivity, stability, and corrosion resistance. Its current-carrying capacity is 2-5% greater than that of aluminum wire, effectively preventing interference and ensuring a long service life

High Quality:Our marine wire is made of tinned copper to make sure good conductivity,Anti-corrosion, high durability,flexibility,stability for a long-lasting performance
Best Practices for Grounding Your Boat Horn
Choosing a clean and dedicated ground point is essential for reliable boat horn operation. Select a grounding site that is a bus or terminal designed specifically for DC negative service. Ensure the contact surface is free of paint, corrosion, oxidation, or dirt, as these can impede electrical conductivity and lead to poor horn performance. It’s important to match the ground to your vessel’s electrical layout rather than improvising with a chassis-style connection, which can introduce noise or inconsistent grounding. Avoid bonding the horn ground to underwater metal components; keep the ground as an electrical return path only. For bank fishing, a portable fish finder relies on a similar clean, dedicated ground to prevent interference and ensure accurate readings. Ensuring your ground point provides quality and value reduces the risk of signal loss and equipment malfunction. For audio components like marine speakers, a stable ground is equally critical to prevent performance issues and maintain clear output.
Keep the ground connection short and direct—daisy-chaining through other equipment can cause voltage drops and reduce horn clarity. Use tight, high-quality hardware that maintains firm contact over time and prevents looseness. Regularly perform a grounding inspection with a multimeter to verify continuity; weak readings indicate a poor connection that needs attention. After any electrical repairs or adjustments, recheck torque and contact quality.
A weak horn output often points to a grounding problem. Treat your ground connection as an ongoing maintenance item rather than a one-time installation step. Proper grounding ensures your boat horn delivers a clear, loud sound when needed and remains reliable in all conditions.
Protect Connections With Heat Shrink and Conduit
Heat shrink tubing and conduit are essential for protecting horn wiring from moisture, vibration, and chafing. Use adhesive-lined heat shrink on every connection to prevent corrosion; its dual-wall design melts an adhesive layer during heating, flowing into crimped areas to create a waterproof seal. Choose a tubing with a 3:1 ratio for flexibility with irregular splice shapes. To apply, position the tubing over the connection, then heat evenly with a heat gun, starting from the center and moving outward. Allow it to cool before handling to ensure a secure, waterproof seal. This adhesive layer ensures comprehensive sealing, especially in blocking water ingress, making it a high glue content solution for harsh marine environments. Without a gauge, you can instead listen for engine knocking to detect low oil pressure from failing components. A mechanical gauge provides direct oil pressure readings without electrical failure risks, similar to how conduit protects wiring from vibration in tough conditions. For complete system reliability, consider the best fish finder as a complementary tool for monitoring underwater conditions.
For wiring runs passing through bulkheads or tight spaces, add conduit to provide mechanical protection against chafing caused by vibration. Combining conduit with heat shrink at terminal points ensures layered protection against saltwater spray and exposure. Proper insulation techniques like these help maintain system reliability and reduce the risk of corrosion at exposed connections.
How to Test Your Boat Horn Wiring Before Hitting the Water
To test your boat horn wiring effectively before heading out, follow these steps. First, disconnect the battery to eliminate the risk of shorts and ensure safety. With the circuit isolated, use a multimeter set to continuity mode to check each wire end-to-end. A beep indicates an unbroken circuit; if there is no sound, the wiring is interrupted. Next, perform maintenance on the battery terminals by cleaning and tightening them, along with the ground connections, to ensure a solid power source. For a reliable installation, always include a dedicated horn relay to protect the switch from high current. Reconnect the battery and verify voltage at the horn by setting your multimeter to DC volts, pressing the horn switch, and confirming that 12 to 13 volts are present. If no voltage shows up, investigate fuses and upstream wiring for faults. If voltage is present but the horn still does not sound, the horn itself may be faulty. Finally, conduct a functional load test by pressing the horn button repeatedly, listening for a consistent, loud tone. Watch for any signs of excessive heat or arcing during the test, as these can indicate electrical issues that need addressing before your trip. Additionally, when examining the horn’s circuit, you can perform an initial resistance check to look for an open circuit reading, which helped identify a water-damaged horn on a previous repair. When mounting the new horn, be sure to seal the mounting holes with marine-grade sealant to prevent water intrusion into the deck.
Common Wiring Mistakes That Kill Your Boat Horn’s Performance
Wiring mistakes that compromise your boat horn’s performance are common, even if connections seem correct. One major issue is using wire gauge that is too small for the run length. Undersized wire increases electrical resistance, causing voltage drops that reduce horn strength. Always match your cable size to the distance and current load, following wiring diagrams that recommend a maximum 3% voltage drop.
Poor grounding also kills performance. Your ground connection must land on clean, corrosion-free metal. A corroded or loose ground creates a weak return path, which can cause the relay to activate without producing sound from the horn. Ensure your ground wire is securely attached and free of corrosion. On fiberglass and plastic hulls, grounding issues are especially common because the materials hinder reliable negative connections.
Overlooking or undersizing overcurrent protection is another mistake. You should place a fuse close to the battery, rated appropriately for your horn’s current draw, not at the switch. This protects your wiring and components from overload or short circuits.
Troubleshooting often involves verifying that your horn load runs through the relay contacts rather than directly through the switch button. This setup prevents the switch from bearing high current and ensures reliable operation.
Finally, always use tinned marine wire to resist corrosion. Seal all connections thoroughly against moisture to prevent terminals from loosening or corroding over time, which quietly degrades horn performance. Loose or corroded terminals can cause intermittent failures and long-term damage.