Mounting a transducer on your trolling motor might seem tricky, but with the right steps, it’s straightforward.
Proper placement and cable routing are key to ensuring accurate readings and smooth operation.
By following simple guidelines—like choosing the right mount, positioning the transducer at the correct distance from the propeller, and securing the cable—you’ll set yourself up for hassle-free use.
Keep reading for a clear, step-by-step process to get it done right.
Choose the Right Transducer Mount for Your Trolling Motor
To choose the right transducer mount, start by matching the mount type to your transducer design. Compatibility is key—you need a mount that fits your specific transducer model. For example, XTM-style transducers designed for trolling motors often require a compatible bracket, while other types may use a clamp or surface mount. Check your sonar unit’s guide to ensure the mount supports your beam type and transducer shape. Durability matters; opt for materials like aluminum or stainless steel that can withstand impacts and corrosion from water exposure. Make sure the mount does not block the motor’s free rotation, which is essential for steering control. Route cables carefully to avoid interference with the propeller, and leave some slack at the top to absorb tension during turns. A clamp-style mount provides a steady hold, keeping the transducer properly oriented as you maneuver, which is vital for accurate sonar readings. Always verify compatibility first to prevent wasting hardware or compromising sonar performance. For top-rated models, reviewers highlight Garmin transducers with CHIRP for superior target separation and clarity under diverse conditions. Consulting a fish finder for boat comparison can help you match the mount to the best-performing models for your setup. Catfish anglers often prefer units with wide beam coverage to effectively scan deeper river channels and structure.

Replaces Part Numbers: MKR-15 transducer mounting kit cross references part 1840201 and 410150-1, specially designed to install sonar transducer on the lower unit of Mi-nn Kota bow-mount or transom-mount trolling motors. Fits motor lower unit sizes: 3-1/4", 3-5/8", 4", 4-1/2"
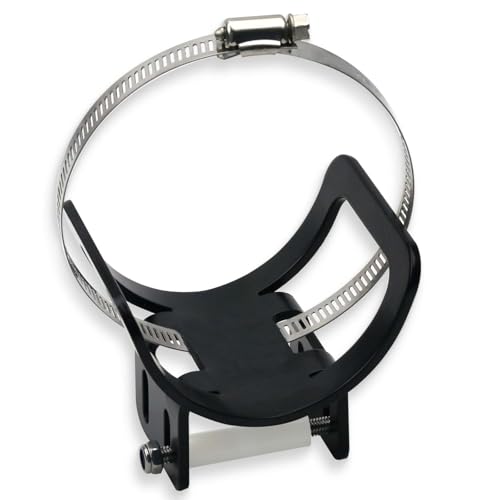
Precision Fitment: Designed as direct replacement for part numbers 410150-1, 1840201, and MKR-15 – mounts transducer to lower unit of Minn Kota bow-mount and transom-mount trolling motors with shaft diameters of 3-1/4", 3-5/8", 4", and 4-1/2"

UNIVERSAL COMPATIBILITY: Specifically engineered for Lowrance Active Imaging 3-in-1 transducers and designed to fit all Minn Kota trolling motors equipped with built-in US2 sensors, ensuring seamless integration and reliable performance.
Secure the Mount to the Motor Shaft
Secure the mount to the motor shaft firmly using appropriate mounting methods, such as a clamp or set screws, ensuring there is no play or wobble. Then, fasten the transducer cable to the shaft with cable ties or waterproof tape, leaving enough slack to accommodate movement without strain. Routing the cable neatly along the shaft or mounting surface prevents snagging or damage, and it is wise to use marine-grade sealant at any entry point to prevent water intrusion into the shaft. After setup, rotate the motor fully to check for binding or interference, adjusting the mount if necessary. When running the system for the first time, observe for wobble or misalignment, and retighten or reposition hardware if needed. Periodically inspect all mounting hardware and cable ties for loosening caused by vibration to maintain reliable operation. Use cable ties designed for automotive or marine applications to secure the wiring firmly, similar to how a fuel sending unit wire is fastened to prevent chafing. For added stability, consider using a mounting bracket designed specifically for aluminum boats to reduce vibration and ensure a secure fit.

DESIGENED FOR: Rail Mount Outboard Bracket is designed to be mounted onto the rail of the boat and provides a secure and stable platform for the motor. It's a great option for boat owners who want to maximize space on their vessel while still being able to use an outboard motor

【Fitment】Universally fit for trolling motors of many brands. Compatible with trolling motors with shafts between 1.15" - 1.25" in diameter. Available with hand control motors only.

【Universal Clamp-On Motor Fit】This bracket is designed to securely hold most clamp-on style electric trolling motors. It's the perfect mounting solution for small boats, kayaks, and canoes with a flat stern surface.
Position the Transducer Away From the Propeller
To prevent damage and ensure accurate sonar readings, position the transducer away from the propeller’s arc. Maintain at least 15 inches of separation from the propeller, following your model’s mounting diagram. Point the narrow end of the transducer away from the propeller to reduce turbulence. Proper orientation improves signal clarity during slow trolling and helps prevent flow deflection toward the blades, which can cause cavitation. Always rotate the motor through its full range—from deployed to stowed and turning—to verify that no contact occurs. Only tighten the mount after confirming safe clearance in every position. This ensures your gear remains protected and your sonar readings stay consistent. For a reliable installation, treat the transducer’s electrical connection with the same care you would give a ground wire for an oil pressure gauge. For comparison, a fuel sending unit requires a stable ground and specific resistance readings to signal accurately, much like the transducer requires proper placement to avoid signal interference. Using marine-grade connectors like SO-239 and PL-259 ensures a corrosion-resistant and reliable signal path for your sonar electronics.

【Enjoy Fishing Life Better】 Frustrated because the picture on your electronics wasn’t the same as advertised? 7400931 MHX XNT Transducer Bracket is a nice addition for your boat that helps your skimmer transom mount transducer to find fish easier to find and get the right scan image. Efficiently improve your transducer running performance without letting go of any fish!

Exact Replacement & Universal Compatibility: This is a direct replacement mount for OEM part #000-10262-001. Designed as a universal transducer bracket for DSI Skimmer-type transducers, it also provides perfect fit and support for 3D and TotalScan transducers, ensuring seamless integration with your existing transom mount setup.

Please see the "Stern Pad Strength Demo Video" on You-tube
Route the Transducer Cable to Avoid Pinch Points
Route the transducer cable to avoid pinch points by following these guidelines. First, secure the cable to the trolling motor shaft with gentle fasteners such as cable ties, electrical tape, or the clips provided. Avoid over-tightening, as crushing or deforming the cable jacket can impair performance. Attach the fasteners at stable points, steering clear of moving joints, and anchor the cable near the motor head to minimize strain. This anchor can be created by attaching zip ties to the base of the coil cord exiting the motor head, looping them around the sonar and Ethernet cables for stability. For ice fishing setups, selecting an ice transducer model like the Humminbird Helix 5 can improve sonar performance through the ice. When selecting a full system, ensure the transducer is compatible with a top speedometer pick to guarantee accurate speed readings on your boat adventure.
For protection against abrasion, leave a service loop of at least 10 centimeters (4 inches) above and below rotating joints. This slack allows the cable to fully stow and deploy without tension. When routing, ensure the cable is directed away from known pinch zones in the mount, using designated channels or guides to prevent compression during folding or movement. If the cable jacket becomes damaged, it may cause erratic pressure readings similar to what occurs when an oil pressure sensor fails.
To prevent interference, keep the transducer cable clear of electrical wires and other high-energy sources, preferably on the manufacturer’s recommended side of the motor. Finally, perform a full movement test to verify that the cable does not bind or rub against any hardware, ensuring safe and reliable operation.

The boat marine trolling motor cable sleeve wire cover is made from thick durable flexible waterproof neoprene material , and the classic black trolling motor cable sleeve match any boat decoration style

【Premium Durability】 The boat trolling motor strap is crafted from high-strength nylon and reinforced Velcro, ensuring long-lasting performance even under harsh marine conditions. Perfect for securing your motor without wear or tear.

HEAVY‑DUTY NEOPRENE PROTECTION – 2 mm thick sleeve shields trolling‑motor and accessory cables from UV, abrasion, and deck snags.
Check Transducer Alignment Before You Fish
Before heading out to fish, verify the transducer alignment. Start by confirming the forward-facing orientation: on barrel mounts, line up the molded marks; on shaft mounts, point the narrow end away from the propeller. Ensure the scan direction matches your motor’s heading so the imaging on the water isn’t offset. Use a small level or similar mounting tool to check that the transducer sits parallel to the bottom line, as even a slight tilt can shift your sonar cone. Cycle the motor from deployed to stowed to make sure the bracket stays secure and doesn’t shift during operation. Inspect for common errors such as loose knobs, backward mounting, or pinch points. Correct alignment now will prevent the need for repeated adjustments once you’re on the water. One simple visual method involves moving the motor head up and down to observe gap differences, then rotating the transducer until the gaps disappear, ensuring the transducer beam aligns with the direction of the trolling motor head. Familiarize yourself with the sonar cone coverage area to understand how the beam’s angle impacts the bottom readout on your screen. A secure, easy setup using a high-quality mount like those reviewed in top comparisons can prevent shifting during operation and maintain consistent alignment. Reviewing key settings on your marine radio helps refine transducer performance by matching frequency and gain to your water depth.

Motor-Mounted Sonar: Allows mounting of transducer on lower unit of most Minn Kota bow- or transom-mount trolling motors

【Function】The Perspective Mode Mount can be adjusted at any time, giving you real-time information about what's going on around you and in front of the boat, as well as in shallow water .To look beneath the surface like never before.

Safer: Install a Transducer Mounting Kit between the sensor and the trolling motor to make driving safer