
Ever wondered how your fuel gauge knows exactly how much gas is in the tank? It’s not magic—there’s a simple mechanism behind it. This system uses a float and a resistor to send your fuel level directly to your dashboard.
Want to learn how it works and why it sometimes gives wrong readings? Keep reading for the full breakdown.
What Exactly Is a Fuel Sending Unit and What Does It Do?
A fuel sending unit is an electronic sensor located inside your fuel tank that measures the amount of fuel remaining. It works by using a float attached to a variable resistor or potentiometer, which moves up and down with the fuel level. As the float’s position changes, it adjusts the electrical signal sent to your vehicle’s dashboard gauge, accurately displaying the fuel level. This system is essential for helping you avoid unexpectedly running out of fuel or stopping for refills too early. For boaters, a similar sensor technology is used in top fish finders to measure water depth and locate underwater structures. Understanding how to interpret echo return signals can help anglers distinguish between fish and submerged objects, improving their catch rate. Mastering sonar screen readouts is key to identifying the best fishing spots and avoiding false targets.
The fuel sending unit’s primary function is to provide real-time data about fuel quantity, not to pump fuel or control engine combustion. Its simplicity helps keep your fuel gauge precise and reliable. When it functions properly, it keeps you informed about your fuel status, aiding in better trip planning and fuel efficiency. If it fails, your gauge may show incorrect readings, but your vehicle will still run—though you might risk running out of fuel if you ignore the signs. Overall, this small component plays a big role in your vehicle’s fuel management system.
How a Fuel Sending Unit Uses a Float and Resistor to Measure Fuel
A fuel sending unit measures fuel level by converting the float’s position into an electrical signal through a resistor. The float rides directly on the fuel surface and pivots a metal arm as the tank fills or empties. This arm sweeps a contact across a variable resistor, changing its resistance based on the float’s position. The vehicle’s dash gauge then interprets this resistance, not the actual fuel volume. For boaters seeking reliable instrumentation, selecting a top speedometer often involves similar considerations of sensor accuracy and placement. Usually, a low resistance indicates a full tank, while higher resistance signals an empty one. The same principle of consistent resistance change applies to the 3-in-1 transducer in fish finders for accurate depth and sonar readings. To ensure accurate readings, the float must move smoothly without sticking, and the resistor’s resistance should change consistently. Any erratic resistance or sticky float motion can cause gauge readings to jump or become incorrect. Similar to a fish finder, proper placement of the sending unit ensures the correct position for reliable signal performance.
Fuel Sending Unit: How the Float Arm and Wiper Create a Signal
As the float moves up or down with the fuel level, it pivots the metal arm and rotates its attached wiper across a resistive track inside the sender. This movement changes the resistance that the gauge reads—higher fuel levels position the wiper toward one end of the track, lower levels toward the other. Essentially, you are converting a mechanical angle into an electrical signal. However, this process is not perfectly precise. Calibration issues can occur if the arm’s motion doesn’t align exactly with the resistive pattern, causing inaccurate fuel readings. Electrical noise from the wiper’s sliding contact can also interfere, making the gauge flicker or bounce. To help maintain signal stability, the sender connects one end of the resistive track to ground, establishing a fixed reference point. The wiper then varies the current path across the resistor, providing a cleaner, more reliable output to the dashboard gauge. Placing the gauge so it reads in the middle of the range helps ensure accurate fuel level monitoring. If the wiper or resistive track becomes worn or dirty, the gauge may show erratic or incorrect readings that signal a failing unit. Much like sonar transducers require correct transducer orientation to avoid signal interference, the wiper must maintain steady contact for accurate output.
3 Fuel Sender Technologies: Float, Reed-Switch, and Solid-State
Float, reed-switch, and solid-state technologies all serve to convert fuel level into a signal, each suited for different needs. A simple float sender features a buoyant arm connected to a variable resistor. As fuel levels change, the float moves, altering the resistance and providing an analog signal. Its main disadvantage is the presence of moving parts that can wear out over time, reducing reliability. For example, the KUS USA SSS sensor uses a 240 ohm to 30 ohm resistance output for empty to full measurements. In contrast, understanding the differences in pitot tube performance can help when selecting other marine sensors. When choosing a gauge to pair with your sender, it helps to review comparisons of the best gauges for your vessel. For kayak anglers, a fish finder can also be integrated to monitor battery levels from a fuel sender.
Reed-switch systems use a magnet attached to a float that moves past sealed reed switches. When the magnet approaches, it activates the switch, creating a stepped resistance output. This method offers greater durability in environments with high vibration or rough conditions because it has no moving parts in contact. However, since the output is stepped rather than continuous, it may lack the precision needed for some applications.
Solid-state capacitive sensors measure changes in electrical capacitance caused by fuel level variations. These sensors have no moving parts, offering exceptional accuracy with resolutions below 1 millimeter. They are well-suited for high-precision requirements but require more complex calibration and specialized electrical wiring. This technology is ideal when exact measurements are critical, and reliability over time is a priority.

Great marine fuel tank sending unit replacement for broken marine fuel sending unit in marine boat fuel tank.

<b>[A Direct Replacement Sending Unit]</b> Sucicago Reed Switch Diesel Fuel Water Level Sensor is a Better Option Than the Traditional Lever Type Sensors. The Boat Fuel Tank Will not Effected by The Constant Movement Caused by Waves and Boat Rocking. <b> It Will give an Accurate Indication of Fuel Level and the Fuel Gauge No Longer Bounces All Over The Place In Windy Wave Situations.</b> <br>

Great marine fuel sending unit replacement for broken boat fuel sending unit in marine boat fuel tank.
Why Your Fuel Sending Unit Shows Empty When the Tank Is Full?
If your fuel sending unit shows empty when the tank is full, the most common cause is an open circuit. This situation causes the gauge to interpret a lack of signal as zero fuel. To troubleshoot, check for broken wires, corroded connectors, or a poor ground connection, as these can interrupt the sender circuit and block the signal. Also, inspect the resistive track inside the sender unit for wear or damage, and examine the wiper contact for failure, both of which can prevent a proper level signal from reaching the gauge. A stuck float at the bottom of the tank or a float arm that has detached from the sensor can also cause the gauge to read empty continuously. Before diving into complex electrical diagnostics, confirm that the float moves freely and that connector pins are clean and corrosion-free. To verify proper calibration, try grounding the sender wire—if the gauge responds, the circuit on the dash side is likely functioning, and the issue is with the sender unit itself. For a clean and reliable repair, follow mounting or wiring tips from the installation guide to ensure secure connections and proper float arm alignment. Similar care is needed when installing a portable fish finder, ensuring the transducer and wiring connections are secure and corrosion-free for a dependable signal. Applying similar care as you would when connecting a horn relay ensures the wiring is secure and corrosion-free for a dependable signal.
Fuel Sending Unit Failure: 5 Symptoms You Can’t Ignore
Erratic fuel gauge behavior is a key sign of a failing fuel sending unit. If your needle jumps after bumps or turns, it indicates poor sensor calibration or loose contacts. A gauge that sticks on full can hide low fuel levels, risking breakdowns, while a stuck-on-empty reading might leave you stranded unexpectedly. Warning lights that do not activate when fuel is low, or stay on regardless of fuel level, also point to issues with resistor tracks or sender contacts. Additionally, inaccurate readings—such as the gauge showing more or less fuel than you actually have—are urgent signals that your fuel sending unit needs repair. Ignoring these symptoms can lead to misjudging your vehicle’s range, increasing the risk of breakdowns or running out of fuel unexpectedly. Modern anglers rely on top picks for underwater cameras that similarly avoid false readings from faulty electronics. These cameras often use infrared light to capture clear images in low-light conditions. For instance, selecting a model with a high-resolution sensor ensures you see precise details underwater rather than misleading shadows.

Wide Compatibility: This fuel tank sending unit gasket fits plastic or metal fuel tanks in boats, marine vessels, trucks, and RVs, offering a universal replacement for fuel sender applications

SAE 5 hole gasket 5 mounting screws with washer

Provides accurate fuel level information
How to Test a Fuel Sending Unit in 10 Minutes
Measure the resistance with the float at rest, then slowly move the float from empty to full. You’re checking for a smooth, steady change in resistance throughout the movement. If you notice dead spots, infinite readings, or zero resistance at any point, the sender is faulty. Compare your readings to the manufacturer’s specifications; if they don’t match, the sensor’s calibration is likely off. This quick test helps determine if the fuel sending unit passes or fails, saving you time and guesswork. Unlike a fishfinder which uses sonar to display fish arches and blobs as varying signals, a fuel sending unit relies on a float and a variable resistor to measure fuel level, not underwater objects. For reliable communication on the water, selecting the right marine radio antenna is equally essential for clear signal transmission.

[High Precision and Long Life]: The exterior is made of stainless steel, and the interior is controlled by high-quality reed switches. The sensor is corrosion-resistant, does not rust, has a long life, stable output signal, and accurate measurement. Suitable for gasoline, diesel, water, methanol, etc.

Calibrated to the Industry Standard of 33-240 Ohms

[High Precision and Long Life]: The exterior is made of stainless steel, and the interior is controlled by high-quality reed switches. The sensor is corrosion-resistant, does not rust, has a long life, stable output signal, and accurate measurement. Suitable for gasoline, diesel, water, methanol, etc.
Don’t Replace Your Sending Unit Until You Check These 4 Things
Before replacing your fuel sending unit, check these four common issues first. First, verify your fuel system’s power supply. A blown fuse or faulty wiring can cause the gauge to read empty, so test the voltage at the sender connector with a multimeter. If there’s no power or inconsistent readings, repair the wiring or replace the fuse before moving on. Second, examine the ground connection. Corrosion, loose bolts, or broken ground wires interrupt the electrical circuit, leading to erratic gauge behavior. Make sure the ground is solid and clean the contact point if needed. Third, inspect the sender’s connector and wiring for damage. Loose terminals, corrosion, or cracked insulation can create open circuits or false signals without the sender itself being faulty. Tighten or replace any damaged wiring. Fourth, check the float arm’s mechanical movement inside the tank. Stuck floats or debris block movement, causing false fuel level readings even if the electrical components are working correctly. Move the float manually, if possible, to see if it moves freely or if debris is present. Don’t replace the sending unit until you’ve confirmed these basics—they’re simpler and less costly to fix.

CROSS-REFERENCE WITH 15306349, 1627 PTA1692 1627 S1410 PT909 EC908 PT1402 0 0
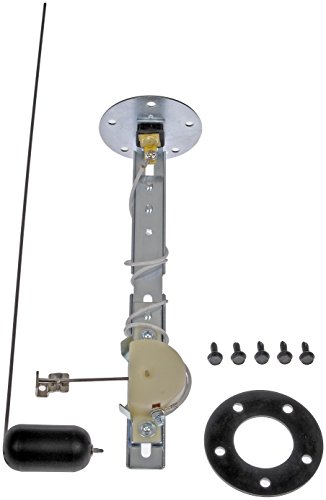
Direct replacement - this fuel tank sending unit is designed to match the fit and function of the original unit on specified applications

High Precision Design: Engineered with 10mm high-resolution stepping and premium reed switch technology for stable and reliable fuel level readings; performs accurately even on bumpy roads or choppy waters; ensures you always know your exact fuel level


