Getting your Helix 5 ready to fish can seem straightforward, but knowing the right steps helps ensure you get accurate readings and avoid frustration. From unpacking to connecting the transducer and power, it’s all about setting up correctly so you’re ready to hit the water.
In this guide, you’ll learn how to mount the transducer, connect the power safely, and turn on the unit for optimal sonar performance.
Follow along to get your fish finder working smoothly and confidently.
What’s in the Helix 5 Box: Gear You Need Before Starting
The Helix 5 box includes all the essential components you need before starting installation, but the specific contents vary depending on whether you have the boat, portable, or ice package. Typically, you’ll find the control head, transducer, and mounting bracket. The style of the transducer differs: a transom mount for boats, an ice-specific model for winter fishing, or other variations based on your package. Check for the power cable and necessary hardware as well. The included 7-pin adapter cable ensures compatibility with Minn Kota trolling motors for dual frequency operation. For aluminum boats, selecting a stable mounting bracket is crucial to avoid vibration and signal loss. For users who also want high-quality audio on the water, choosing marine speakers with amp can significantly enhance the boating experience.
Before you begin, gather your own drill and safety gear to prepare for installation. Do not attempt display calibration yet; save this step for after mounting the head on your vessel or setup. For storage, consider a protective cover if you plan to keep the unit long-term. Keep the portable bag ready if you intend to transport the device frequently.
Ensure that every component matches your specific fishing plan and setup. Confirm the parts are complete and compatible to avoid hunting for missing pieces later. Planning ahead saves frustration and helps you get started smoothly. Remember that stern light rules require a white light visible from aft when operating at night, so check local regulations alongside your gear checklist.

【Enjoy Fishing Life Better】 Frustrated because the picture on your electronics wasn’t the same as advertised? 7400931 MHX XNT Transducer Bracket is a nice addition for your boat that helps your skimmer transom mount transducer to find fish easier to find and get the right scan image. Efficiently improve your transducer running performance without letting go of any fish!

Professional:The transducer mounting plate is specially designed for XNT transducer, Compatible models XNT 9 20, XNT 9 20 T, XNT 9 QB 90 T, XNT 9 QB 90, XNT 9 SI 180 T

🛥️[Product Overview] Stern Pad, Screwless Transducer Mounting Plate kit, Marine-Grade Transducer Mounting Board Hardware Kit.
Wire the Helix 5 to Power, Fuse, and Battery
To wire your Helix 5, connect the power cable directly to the battery or a fuse panel, starting with a 3 amp slow-blow fuse in the positive lead. Installing the inline fuse holder as close to the power source as possible protects your system from power surges and short circuits. Route the red wire to the positive terminal after the fuse, and connect the black wire to the negative or ground terminal. Use the appropriate wire gauge for extensions: 18 AWG for runs up to 6 feet, 14 AWG for 6 to 12 feet, and 12 AWG for longer distances to ensure safe current flow and prevent voltage drops. Keep the power path clean and dedicated to avoid connection issues. Always verify the power cable is disconnected before starting, and secure all terminations to prevent accidental disconnection or moisture intrusion. Protect all connections from water exposure to maintain reliable operation. Maintaining correct polarity is critical even though reversing connections does not damage the device. For best performance, use a dedicated deep-cycle marine battery to avoid interference from other electronics. You can also consider storing the battery in a dedicated electronics box for boats to keep connections dry and organized. A clean, reliable job also involves mounting or wiring tips to reduce vibration and strain on the power cable.
Connect Your Helix 5 Transducer the Right Way
To ensure optimal sonar performance, mount the transducer so its sonar face stays fully submerged and free from turbulence or bubbles that could interfere with the signal. Position the transducer so that the running surface is parallel to the waterline. Level it side-to-side, then mark the mounting spots before drilling. Apply sealant to the holes to prevent water intrusion and secure the transducer with the provided hardware—be careful not to overtighten, which can damage the mounting bracket or transducer. Before drilling, use chalk to outline drill locations for precision to account for obstacles and hull features. For accurate results on the water, ensure the transducer is level to avoid incorrect depth readings. When mounting, check that the transducer is positioned away from the hull’s strakes or step to avoid turbulence that could degrade sonar performance. To further verify the setup, you can check for voltage resistance readings if your system has a separate fuel sending unit that requires testing.
Cable routing is just as crucial as proper mounting. Run the transducer cable separately from the power cables to minimize electrical interference. Protect the cable from sharp edges, moving parts, and potential abrasion points by using clamps or tie-downs. Leave enough slack to accommodate engine movement without risking snagging or strain on the connection. When drilling through the transom, keep the hole above the waterline and seal it thoroughly with silicone to prevent water intrusion.
Finally, always fully insert the connector into the dedicated port on the control head, ensuring it seats completely. Proper connection guarantees accurate and reliable sonar data, making your fishing trips more successful.

🛥️[Product Overview] Stern Pad, Screwless Transducer Mounting Plate kit, Marine-Grade Transducer Mounting Board Hardware Kit.

Complete Kit for Easy Installation: Our no drill transducer mount kit includes all necessary accessories for a seamless installation: 1 transducer pad block, 1 scouring pad, 1 cleaning wipe, and 3 black cable clips; Simply clean the installation surface, peel off the adhesive, align the position, and press firmly for a few minutes; (Note: Please wait 18 hours before mounting the transducer to ensure the adhesive sets firmly, reducing the risk of detachment during use

Universal Compatibility: 1840201 410150-1 MKR-15 mounting kit is designed for Minn Kota lower unit trolling motors with shaft diameters of 3-1/4", 3-5/8", 4", and 4-1/2"
Power On and Check for Automatic Transducer Detection
Powering on your HELIX 5 starts with a single press of the POWER/LIGHT key. Once the title screen appears, pressing the MENU key will bring up Start-Up Options. The device then checks for automatic transducer detection. If it finds a functioning transducer—especially one submerged in water—it will boot into Normal mode, displaying depth readings and a sonar view along the bottom of the screen. A message confirms the transducer connection, indicating the unit is ready for use. For a smooth setup, it helps to have a well-organized boat switch panel that provides reliable power to your electronics. For those seeking optimal audio while on the water, consider pairing your electronics with top marine speakers for enhanced performance. In addition, choosing marine speakers with LED lights can improve visibility and style on board.
If the transducer is not detected, the system defaults to Simulator mode. This means the transducer isn’t being read correctly. The most common cause is a loose or faulty cable connection. To fix this, disconnect the transducer cable, reseat it securely, and restart the unit. Ensuring proper transducer calibration and using an adequate power supply also contribute to reliable detection. If problems persist, you can manually select the sonar source. A quick way to verify the transducer is working is to switch to a 2D sonar view and look for a clear bottom signal, which confirms proper functioning.
Match Your Transducer Type for Accurate Sonar
Your HELIX 5’s sonar performance relies heavily on pairing it with the correct transducer family for its specific sonar features. Compatibility is model-specific across different generations, meaning a standard 2D-only transducer won’t support the Down Imaging modes on your CHIRP DI model. Always consult Humminbird’s documentation for your exact series before purchasing a transducer. After confirming the right type, pay close attention to installation positioning to ensure sonar accuracy. Mount your transducer away from the transom edge to avoid turbulence, and position it slightly lower than the boat’s bottom. A transom-mount transducer needs to sit level to provide consistent 200/83 kHz coverage. If you’re using a trolling motor, make sure the transducer is securely attached and positioned correctly. A mismatched or poorly placed transducer can limit your sonar mode options and lead to distorted readings, even if the connector fits properly. This is because transducer placement directly affects how sonar beams interact with water and structure. For the best combination of performance and value, review top-rated GPS fish finder combos with included transducers compared online. Just as with side navigation lights, accurate placement relative to your boat’s structure is critical for proper function and compliance with operational standards.

Motor-Mounted Sonar: Allows mounting of transducer on lower unit of most Minn Kota bow- or transom-mount trolling motors
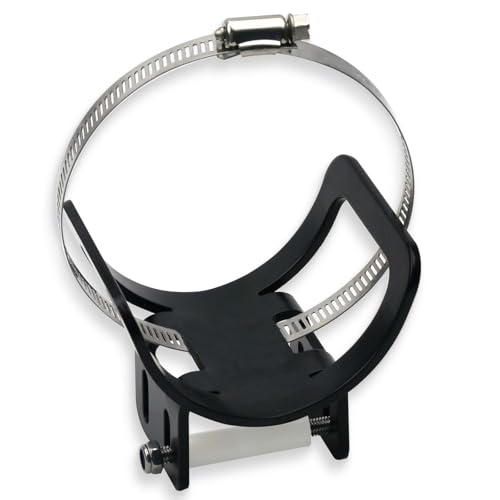
Precision Fitment: Designed as direct replacement for part numbers 410150-1, 1840201, and MKR-15 – mounts transducer to lower unit of Minn Kota bow-mount and transom-mount trolling motors with shaft diameters of 3-1/4", 3-5/8", 4", and 4-1/2"

Enjoy a Better Fishing Experience - Tired of your fishfinder’s display not matching the advertised performance? The 7400931 MHX XNT Transducer Bracket ensures precise scanning and smoother performance for your skimmer transom-mount transducer. Get sharper images, spot fish effortlessly, and never miss a catch
Set Auto Sonar Mode and Sensitivity in the Sonar Tab
Once you’ve confirmed the transducer and its placement, setting up Auto Sonar mode and adjusting sensitivity is straightforward. To do this, press MENU twice and select the Sonar tab where these options are located. Auto Sonar mode automatically manages depth up to 1500 feet for SONAR and 600 feet for DI, removing the need for manual depth adjustments. This feature is helpful when you’re focused on detecting fish or structure rather than fine-tuning depth yourself. Before adjusting settings, always verify that the transducer is facing forward to ensure accurate readings, as transducer orientation directly impacts sonar performance. For best results, ensure your boat’s courtesy lights are not creating electrical interference that could distort the sonar signal. Many beginners find that starting with a top-rated unit simplifies the learning curve significantly.
Sensitivity controls how much detail appears on the screen. The default setting is 10 on a scale of 1 to 20. Increase sensitivity in clear or deep water to reveal faint targets and fine structures. Conversely, lower it in muddy or turbulent conditions to reduce clutter and noise. You can adjust sensitivity quickly via the Sonar tab or X-Press menu. Higher sensitivity shows weak signals, while lower sensitivity emphasizes stronger returns. Fine-tune until you get clear, useful readings without excessive noise or clutter.

Compatible with: All HELIX Series except non-CHIRP DI models, Matrix 10, 12, 15, 17, 20, 27, 67, 77, 87, 97, All 100 and 300 Series except DI, All 500 Series except DI, All 600 Series except DI, All 700 Series except DI, All 800 Series except DI, All 900 Series except DI, 3D models, All 1100 Series except DI, and HDR650 to the maximum capability of the transducer.

Dual Beam Sonar: Choose from a narrow and a wide beam for great detail or a generous coverage area, helping you identify fish, structure and contours.

Transom-Mount Transducer: Provides Dual Spectrum CHIRP 2D sonar for compatible HELIX models
Helix 5 Won’t Start? Quick Power and Sonar Fixes
If your Helix 5 won’t start, the power or sonar system is likely at fault. Begin by checking the power cable connections, ensuring the red wire connects to the positive terminal and the black to the negative. Inspect the inline fuse for any signs of damage or corrosion—replacing it if necessary. Measure the battery voltage at the connector; at least 12.2 volts is required for proper operation. Look closely for corrosion on pins or terminals; clean these thoroughly with a suitable electrical contact cleaner. For software troubleshooting, remove any SD cards and disconnect accessories like transducers or external GPS units to prevent shorts or device conflicts. Waterproofing is crucial—verify the transducer cable is fully seated and the unit’s connector remains dry. Wiggling the power cable can help identify intermittent faults that may cause startup issues. Additionally, confirm the transducer is submerged properly and free of debris, as poor contact can prevent the unit from functioning correctly. To get the best reading, adjust the sonar sensitivity settings to match water depth and clarity. If these steps don’t resolve the problem, try testing the Helix 5 on another battery to isolate whether the issue stems from the battery itself. For fishermen requiring a permanent install, a reliable top radar mount can ensure your display stays securely positioned.

PC 11 - Filtered Power Cable

【Perfect Compatibility】Filter Power Cord Compatible with Helix and earlier models with Down Imaging and Side Imaging Sonar,such as HELIX 8, HELIX 9, HELIX 10, HELIX 12, HELIX 15 Series, 800 Series, 900 Series, 1100 Series products, 797, 798 Series 720057-1 products

Brand Introduction:Introducing the Hodeoo PC 11 - filtered power cord,designed specifically for Humminbird black standard,compatible with all helix series and earlier models with down imaging and side imaging sonar
Final Checks Before You Cast a Line
Lower the boat into water deep enough so the transducer remains fully submerged. Check that sonar returns are clear, with no turbulence or interference from nearby electronics, as these can cause inaccurate readings. For GPS-enabled models, verify that you have a valid fix type, such as Enhanced or 3D, indicating a precise location lock. Ensure all cable connections are fully seated and protected from water entry. Leave enough slack to allow full tilting of the transducer without tugging on the cables. Secure excess cable to prevent snagging or damage during operation, and use the rubber stop to adjust the transducer’s float depth for optimal performance. Finally, test the display by moving the keypad and sonar controls to confirm they respond normally. Once everything is properly set up and responding well, you are ready to head out and fish.