Having trouble with your boat speedometer not showing the right speed? Often, the fix can be as simple as checking the hose and pickup for blockages or cracks.
By following a few straightforward steps, you can often restore your gauge’s accuracy without much hassle.
Keep reading to learn how to troubleshoot and get your speedometer working properly again.
Is Your Boat Speedometer Dead? Blow Into the Hose to Test
A quick blow into the boat’s speedometer hose confirms whether the gauge can respond. First, disconnect the hose from the speedometer. Then, gently blow low-pressure air into the hose. If the needle moves, it indicates the gauge is still reacting to air pressure, meaning it isn’t dead. If there’s no movement, a blockage or the gauge itself might be faulty. This test doesn’t check for accuracy but quickly shows if air can reach the needle. Combining this with basic wiring checks can help rule out electrical problems upstream. Make sure the hose isn’t kinked, clogged with debris, or filled with trapped water, as these will prevent airflow. Clear any obstructions and retest. If the needle remains still after confirming airflow, the gauge probably needs replacing. For beginners looking to outfit their boat, exploring top fish finders can help simplify the decision process. One approach to enjoying clearer audio while on the water is to choose marine bluetooth speakers that deliver reliable performance in harsh environments. Always reconnect the hose carefully after testing to avoid damage. For anglers seeking reliable alternatives, consider reviewing top Garmin Striker 4CV reviews that compare quality and performance.

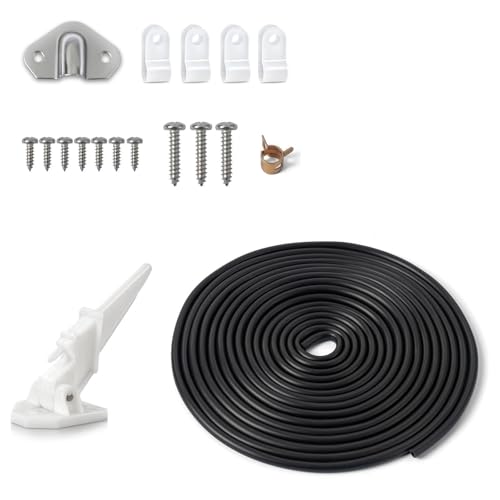
The speedometer coupling connector repair kit compatible with Mercruiser 1991-1997 Alpha One Gen II sterndrive models

20-foot enough length of tubing provides ample reach to accommodate various boat sizes and configurations.

Fitment: This speedometer hose coupling kit is compatible with MerCruiser Alpha One Gen II sterndrive Motor 1991-1997. Replaces Mercury 22-815956A and 815956A1. Please verify your model and part number before purchase
Where’s the Speedometer Pickup? Here’s What to Check
The speedometer pickup is typically a pitot tube mounted on the transom or hull to measure water pressure. Its positioning is crucial: the tube must face forward into clean water, not turbulence or prop wash, to ensure accurate readings. It should be at least 6 inches away from the propeller tips and positioned below the waterline so it maintains consistent pressure at higher speeds. For budget-conscious boaters, choosing a model with a durable pickup can prevent premature failure, as lower-cost materials may corrode faster in saltwater environments.
Check the mounting hardware carefully. The pickup needs to be held firmly in place; a loose fitting can cause fluctuating or zero readings by disrupting the water pressure signal. Before drilling any new holes, verify that the existing mounting holes align with your boat’s pattern, and avoid forcing the unit into an improper position. Examine the pickup for cracks or debris blocking the inlet. A cracked or obstructed pickup prevents water from reaching your gauge, leading to incorrect or no readings. If the orientation, mounting, and cleanliness are correct but the gauge still shows no data, the pickup assembly itself may be faulty or damaged. For a reliable installation, apply marine-grade sealant around the mounting holes to prevent water intrusion and corrosion. This principle of using corrosion-resistant materials is also critical when selecting marine speakers, as they must withstand constant exposure to moisture and salt spray.

Universal Pitot Tube replacement for any brands.

Reliable Quality - Made of high-quality materials, provide accurate degrees, stable quality, and long service life

Pitot tube delivers accurate speedometer reading
Inspect the Speedometer Hose for Cuts, Kinks, and Leaks
To inspect the speedometer hose effectively, start by tracing it from the gauge back to the pitot tube or lower-unit connection. Check the entire visible length of the hose—not just the ends—for any signs of damage. Look for cuts, holes, or cracks, especially near bends or fittings, as these areas are more prone to wear. If the hose color appears faded or brittle, it indicates aging and potential deterioration. Pay attention to tight spaces where the hose might rub against structural parts or get pinched by cable ties, which can cause kinks or restrictions. Sharp kinks can impede airflow, leading to slow or erratic speedometer readings. Examine both ends of the hose for loose fittings; water seeping at the gauge or transom connection can signal a leak. Do not attempt to patch compromised sections—the entire hose should be replaced to ensure proper function. After installing a new hose, double-check that no pinch points or sharp bends remain that could affect accurate readings. A kink in the hose mimics the airflow obstruction that commonly causes speedometer malfunction. For anglers who also rely on precision electronics, reviewing top Garmin fish finders for ice fishing can help ensure reliable performance in cold conditions. Comparing the best models ensures you select a fish finder for boat that matches your specific fishing needs. Understanding how to interpret sonar display settings can further enhance your ability to detect fish and structure beneath the surface.

Universal Pitot Tube replacement for any brands.
【Complete Marine Boat Speedometer Kit】 Our marine boat speedometer kit includes 1 yacht speedometer, 1 metal case, 6m/19.69FT hose, and all mounting parts. The sensitive boat speed sensor captures real-time water pressure, delivering accurate 0-60MPH/0-60KNOTS readings. Perfect for replacing outdated or unreliable boat speedometer pickup systems on yachts, boats, and ships.

Perfect Size: EcoBrisa marine boat speedometer PVC hose 3.5mm ID x 6mm OD length 20 FT(totle40ft), provides sufficient extension range and can be cut into any length to accommodate various ship sizes and configurations.
Clear Blockages From the Speedometer Pressure Line Safely
To clear a blockage from the speedometer pressure line safely, first identify the exact location of the obstruction—whether it’s the pitot pickup, lower-unit passage, hose junction, or tube connected to the gauge. Always disconnect the hose from the gauge before attempting cleaning to protect the delicate mechanism. Use low-pressure air on the pickup side to blow out debris so it exits away from the gauge, or gently probe lodged gunk with a soft tool. Flush the line with fresh water, adding mild detergent for stubborn buildup, then rinse thoroughly with plain water. Alternative methods include gently vacuuming the line, but avoid forcing tools deeper into the passage. Common mistakes to avoid include skipping the disconnect step, spraying high-pressure air directly into the gauge, or not verifying the flow before reconnecting. Ensure both ends are open and clear prior to reassembly to prevent future blockages. The blockage is often caused by debris in the small aperture on the gearbox leading edge. Using a portable fish finder kit can help you identify underwater hazards that might stir up additional debris near the pickup. For a permanent power source to run detection equipment like that, you can learn battery connection techniques similar to those used for marine electronics. A chartplotter with sonar integration is particularly useful for mapping the seabed and avoiding debris fields that clog speedometer lines.

✔It can be used with any pressure driven speedometer up to 80 mph, weed-resistant system provides the steady water pressure required for accurate readings.

Kit includes everything needed to install a pitot on the outer surface of a boat to measure boat speed

List of Packages: Our oil pressure gauge kit include a 72-inch long copper tube and other brass threaded fittings, including 1/8-inch NPT male x 1/8-inch OD, 1/8-inch NPT female x 1/8-inch OD, and 1/4-inch x 1/8-inch NPT, and a thread sealant tape
What to Do If the Gauge Needle Still Won’t Move
If the gauge needle still won’t move after clearing blockages, start by verifying that the gauge has proper power and a solid ground connection. Ensure that ignition power is reaching the gauge and inspect the fuse for any issues. Tighten any loose terminals and clean corrosion from connectors to restore a reliable ground path. Next, examine the gauge body for signs of moisture, fogging, or rust, which can affect performance. Confirm that the needle isn’t physically stuck against the bezel or obstructed. Check the pressure hose connection to make sure it is fully seated and inspect the hose for splits or collapses. If the sender or pickup assembly shows damage, inspect the pitot tube alignment to ensure proper operation. Because a fouled or blocked speedo tube is a common cause of data loss while on plane, you can also apply gentle air pressure at the gauge fitting to test if the needle responds. For a more permanent solution, consider upgrading to digital boat gauges that offer greater accuracy and fewer mechanical issues than traditional analog models. Consider integrating a Garmin ECHOMAP unit for a combined GPS and sonar display that provides highly accurate speed data without relying on a mechanical pitot tube. Additionally, Garmin fish finders display real-time speed data derived from GPS, eliminating the pitot tube entirely. If the needle remains stationary despite these efforts, internal failure of the gauge is likely, and calibration or needle alignment will not fix the problem. In this case, replacing the gauge with a matching type and range is necessary.

FITMENT: Compatible with Ford Mustang 1994 1995 1996 1997 1998.

Restores function - this speedometer cable is designed for use in a wide range of vehicle applications and is engineered to replace a cable that is malfunctioning or has failed
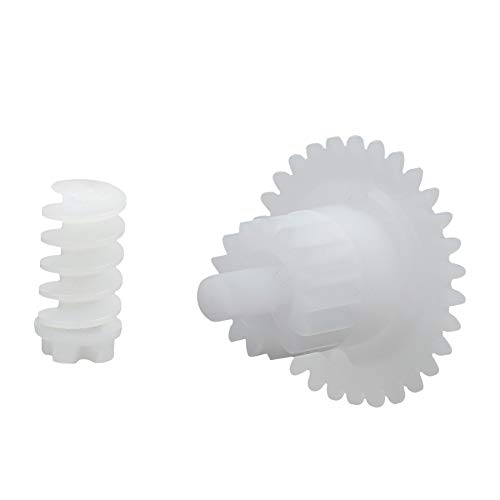
FITMENT: Compatible with Ford Mustang 1994 1995 1996 1997 1998.
Run a Final On-Water Test to Confirm the Repair
Once the gauge is reinstalled and all connections are secure, take the boat out for a final on-water test to confirm the repair. Start at idle and observe whether the needle rises smoothly from zero without lag. Then, maintain a steady speed in calm water—this minimizes environmental factors like current and waves. Use your GPS to compare the reading and verify calibration accuracy, but don’t expect a perfect match. Focus on consistent, lag-free response rather than exact numbers. If the needle wavers or jumps erratically, this may point to air in the line or a loose fitting, similar to how trapped air causes erratic pressure readings. For clarity during night tests, ensure your bimini top stern light is functioning to meet safety visibility requirements.
Run reciprocal passes to average out any current bias. During these runs, watch that the hose remains unpinched and the pickup stays clear. When you stop, ensure the needle returns to zero. A stable and consistent reading across multiple passes indicates a solid repair. Record this baseline reading for future reference to quickly identify any deviations later. For comparison, anglers often rely on ice fishing sonar to gauge depth and structure, but here your speedometer’s consistency matters most.
Prevent Repeat Failures With Simple Maintenance Habits
Regularly cleaning the pitot tube and pickup port is essential to prevent repeat speedometer failures. After each use, flush the tube with fresh water to wash away dirt and debris. Scrub the opening with a stiff brush to remove stubborn buildup, and only use low-pressure air after disconnecting the hose to blow out any residual blockages. Inspect the pickup area frequently to check for grass, mud, or other obstructions that can impair function. When storing your equipment, dry the hose thoroughly by blowing air through it—this helps prevent trapped water, which can freeze and cause damage. Always check hoses for cracks, softness, or signs of wear, and tighten loose clamps or replace worn tubing promptly. Never force air directly into the gauge line; always disconnect the line first to avoid damaging the system. If you notice recurring clogs, consider they may indicate upstream buildup or worn components, not just a temporary issue. Developing these simple maintenance habits ensures your speedometer stays reliable over multiple outings. Consistent upkeep prevents corrosion and electrical failures that can compromise visibility when navigating at night. A similar preventative approach applies to choosing the best anchor light, where routine inspection and proper placement prevent corrosion and failures.